• Keyboard Shortcuts

    Shortcut keys help provide an easier and quicker method of navigating and executing commands in the computer software.

  • Hardware Tips

    Learn about the latest computer hardware and find out how to diagnose

  • Knowledge Practise questions and answers

    Here you can practise more questions and answers to improve your knowledge on computer

Wednesday 28 February 2018

Why wont my computer turn on?

Why wont my computer turn on?


Note: This page relates primarily to desktop computers and the most common causes for the computer to not turn on. More specific troubleshooting steps for a laptop computer is on our page for a laptop computer that is not turning on.

Tip: If you have never turned on the computer before, you should check out our page about how to turn on a computer.

If you are uncertain if the computer is turning on or not, this can be checked by locating any fans inside the computer or fans that are visible from the outside of the computer. If these fans are spinning, the computer is receiving power and this document may not apply to your issue.

Note:
If the computer is turning on but is not posting (beeping) or showing any picture on the display, see POST troubleshooting.

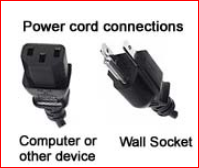
Power cord not connected properly

Verify that the power cord is connected properly to the wall and the back of the computer. If it looks ok, disconnect and reconnect both ends of the power cord to make sure the cable is not loose.

Power strip or outlet

 
If you have a power strip (surge protector) or UPS that turns everything off/on at once, disconnect the computer power from it and connect the cord directly to the wall outlet.

If connecting the computer directly to the wall outlet still does not work verify the outlet works by connecting another electrical device to that same outlet.

Third-party hardware

 
If any hardware has been recently added to the computer, it is recommended that you temporarily disconnect or remove it to ensure that it's not the cause of your issue.

Note: If the computer was working fine before you added the new hardware, and the computer is not beeping but is turning on, see the POST troubleshooting steps.

Bad power cable

 
Verify that the cable supplying power to your computer is not bad or damaged by using another power cable.

Tip: Most monitors use the same power cable and can be swapped for the computer power cable.

Power supply button

 
Some computer power supplies may have their own power button, like that shown in the picture. Check the back of the computer and make sure there are no additional buttons that have been turned off and are preventing power to the computer.

Incorrect power supply

 
If you are building a computer, or it has never been turned on it may have a defective power supply that is not supplying enough power. Verify your power supply meets the requirements of your motherboard, processor, and video card.

How do I determine how big my power supply is?
How big of a computer power supply should I get?


Bad battery

 
If your computer is a laptop or portable computer that utilizes a battery for mobility, it may be causing your issue.

If your computer powers on when the cable is connected to the portable computer, but not when it is disconnected, we recommend you purchase a new battery.


If your computer does not power on with the battery and power cable connected, try removing the battery (if possible) and see if the computer can turn on with only the power cable connected. If no power is still received, skip to the final section.


Loosely connected hardware

 
As mentioned earlier, each time your computer tries turn on it runs a POST (Power On Self Test) and if any of the hardware components in your computer fail this test the computer will not turn on. If the computer cannot test a component because it has become loose or a cable connected to the device has become loose then it will fail the POST.

Note:
When inside of a computer make sure you are aware of ESD and how to protect your computer from ESD.

Unplug all cables from the back of the computer and open the computer and reseat all expansion cards and memory in the computer. After all cards have been reseated make sure all cables are firmly connected by disconnecting and reconnecting all drive cables and fan cables.

After everything has been disconnected and reconnected connect only the power cable to the back of the computer and try turning on the computer. If the computer turns on you can turn off the computer and reconnect all the cables.

Bad power supply, button, power board, or inverter

 
If, after following the above sections, your computer still receives no power, it is likely that a hardware component in the computer has failed. It is possible the power supply has failed. If you have a laptop or do not want to replace the power supply yourself, we suggest taking the computer to a repair center.

If you have a desktop computer and plan on trying to repair the computer yourself open the computer and verify the power connections. You can verify the connection by disconnecting the main power cable and reconnecting the power cable to make sure it has not become loose. Also, verify the power button cable is correctly connected to the motherboard.

If the power supply connections look ok, but the computer still cannot turn on, your computer has a bad component. We recommend replacing the hardware in the following order.

Power supply
Video card
Motherboard
Processor and heat sink


Additional information
Computer powers on and then immediately turns off.
Computer does not turn off.
See the boot and power supply definitions for further information and related links.
Computer power supply help and support.

My computer monitor randomly shuts off

My computer monitor randomly shuts off


There are several possible reasons why a monitor would turn off randomly. Some of the reasons relate to the monitor while others relate to the computer.

Tip: If the monitor is staying on, but losing signal (e.g., the power light goes from green to orange) this is almost always an issue with the computer and not the monitor. If the monitor power light turns off, then it is almost definitely a problem with the monitor.

Note: If you've been away from the computer and the monitor is turning off but wakes up if you click a mouse button or press a key on the keyboard, the monitor is turning off because of power management features.

Monitor overheating
One reason the monitor could shut off is because it is overheating. When a monitor overheats, it will shut off to prevent damage to the circuitry inside. Causes of overheating include dust build-up, excessive heat or humidity, or blockage of the vents that allow the heat to escape.

If the monitor is overheating, it is best to unplug the monitor and let it cool down fully before using again. Then, if you have canned air (anti-static, for electronics), try to blow out any dust that may be inside the monitor casing. If the room where the monitor is being used is very hot, find a way to cool it down, either by turning on a fan or the air conditioning system. Wait until the room cools down some before trying to use the monitor again.

Also, if you're using an older CRT monitor, upgrading to a newer flat panel display will resolve many heat related issues in a hot environment.

Loose cable
Although not as common, if the power cord is loose and is not securely connected to the back of the monitor, it can cause a loss of power, resulting in the monitor shutting off. Make sure the power cord is firmly in place in the back of the monitor. It's also possible that the power connector in the monitor is going bad and not receiving adequate power from the power cord. In this case, it is typically best to replace the monitor instead of having it repaired.

Bad Monitor
Another reason the monitor could shut off is because of a malfunction in the circuitry. There could be a short in the wiring or some other failure in the circuitry, causing the picture to go black or causing the monitor to shut off completely. In this case, there may not be much you can do other than buying a new replacement monitor. Monitors are usually not economical to have repaired since the repair cost can be more than the price of a new monitor. You could bring the monitor to a computer repair shop to have it looked at, but they are probably going to also recommend replacing the monitor.

Video card or motherboard problem
If the monitor is staying on, but you loose the video signal, it's very likely an issue with the video card or motherboard in the computer. A computer randomly shutting off can also be an issue with the computer or video card overheating or a defect with the video card.

Troubleshooting a bad video card.
If the video card is a known good video or if the video card is on the motherboard, there may also be problems with the motherboard. A bulged capacitor or other failing components on the motherboard can cause a computer or monitor to shut off.

Testing my computer motherboard and CPU for failures?


Additional information
Computer turns off without warning.
See our monitor definitions for further information and related links.
Computer monitor help and support.

How much memory or RAM should my computer have?

How much memory or RAM should my computer have?


This question depends on the type of computer user you are, what programs you plan on running on the computer, and how many programs you have open at a given time. A method of determining how much RAM you should have is to look at the system requirements of the programs you run on your computer and double the memory requirements. However, below is the general recommendation for the amount of memory we suggest that today's computers have.

Minimum: 2 GB
Recommended: 4-6 GB
Excellent: 8 GB or more.

If you are using an older computer, with an older version of an operating system, the minimum memory requirements can be a lot less. For example, users who are still running Microsoft Windows 98 can get away with 64 MB of memory since its requirements are only 24 MB.

Note: Keep in mind that a 32-bit version of any Microsoft Windows operating system only detects a maximum of 4 GB of total system memory. Upgrading to a 64-bit processor and a 64-bit version of Windows will increase your memory requirements, but it also allows your computer to recognize more memory.

Windows detects 2.75 GB or no more than 4 GB of memory.


What happens if my computer has less than 2 GB?


As long as you are using an older operating system as mentioned above, you can still get away with 2 GB or less of memory. However, running an older operating system can pose a security threat because older operating systems are no longer updated. If you are running a newer computer with 2 GB or less of memory, having that low of an amount of memory can cause the computer to run slow.

How to install computer memory (RAM)

How to install computer memory (RAM)

Memory buying tips


Computer memory buying tips.


Before getting started


  • Ensure you are familiar with ESD and its potential dangers.
  • When installing the memory make sure the computer is off and unplugged.

Locate memory slots and install memory

  • DIMM memory installation steps (most common)
  • RIMM memory installation steps
  • Notebook (laptop) memory installation steps
  • SIMM memory installation steps

DIMM (DRAM, SDRAM, and DDR) memory installation steps

Note: When handling memory, hold it by each end of the module and be careful not to bend it, flex it or drop it while handling it. When pushing the memory into the computer do not apply an excessive amount of pressure, doing this could cause damage to the memory module as well as the slots on the motherboard. Finally, when installing the memory, distribute the pressure evenly by pressing on both corners of the memory module.

Once the memory has been purchased, locate the memory slots on the computer motherboard. If no memory slots are available on the computer, one or more memory modules must be removed before the memory can be installed.

Note: If the computer has a small form factor, it may be difficult to access the memory slots. You may have to temporarily remove cables or expansion cards before you can access them easily. When disconnecting anything from the computer make sure you can remember where each cable and card goes.

Each slot on a motherboard that supports a DIMM is a bank, therefore the computer will work if just one memory module is purchased.

Examine the memory module before installing it into the computer. At the bottom of the memory module you should notice one or more notches at the bottom of the card, like those shown in the picture below.

Make sure that the notches match up with the memory slot you are installing the memory into. These notches allow the memory to only be installed in one direction and if it is not a compatible memory will not match up at all.

After verifying the notches and direction the memory needs to be installed move each memory slot tab out or away from the memory module. These tabs will snap into place as the memory module is installed.

Once these tabs have been moved out, push the memory module in at a vertical or 90 degree angle. As the memory module is being pushed, the two tabs should snap and hold the memory module into place.

After the memory has been installed in the computer, plug the computer back in and turn the computer on. As the computer is booting the memory should be automatically detected and setup. If you have any difficulties with the memory being detected or setup, enter the BIOS setup and configure the settings manually or make sure the memory is being detected.

RIMM memory installation steps


What makes RIMM memory modules different from DIMM memory modules is the C-RIMM memory module. This module allows the computer to have a continuous flow of data. When installing a new RIMM remove the C-RIMM. This module is a small circuit board and has a few or no chips on it.

Once the C-RIMM module has been removed and the two tabs are in the outwards position, push the RIMM memory module in at a vertical or 90 degree angle. As the memory module is being pushed, the two tabs should snap and hold the memory module into place.

Installing notebook (laptop) memory

Before the memory can be installed into a notebook the memory slots must be located. If you are unfamiliar with where these slots are located, below is a listing of possible locations:

On a compartment on the bottom of the laptop.
Under the keyboard.
Within the computer.
If you are unable to locate the slots after looking at each of the above recommendations, we recommended you contact the computer manufacturer for additional help and information.

Once the slots have been located, the next step will be to install the computer memory. Today, most laptops follow the same memory installation.

Because laptops are thin when compared to a desktop computer, the memory banks are horizontal with the laptop. The memory must be inserted at an angle, about a 75-degree angle and once in the slot press down on the memory to snap the memory into place. The memory should also lay horizontally with the computer.

SIMM memory installation steps


30 and 72-Pin SIMM memory modules must occupy a bank. Computers that use 72-Pin SIMM's have two sockets as one bank. Therefore, two memory modules of equal value must be installed in pairs, unless instructed otherwise by the computer or motherboard manufacturer.

The installation of most SIMM memory is the same. The memory must be entered at an angle, about a 75-degree angle and while still in the memory slot, moved to a vertical or 90-degree angle. As the memory module is moved to a vertical position it should snap into place. When installed, ensure that both sides of the memory module are snapped into place. If a memory module is not installed properly or not all the way in, this could cause damage or the computer.

It is recommended that the larger memory modules be installed in the lowest available banks. For example, if the computer has a pair of 4 MB memory modules and you are installing two 32 MB memory modules make sure the 32 MB memory modules are in bank 0 and 1 or 1 and 2.

Note: Some computer manufacturers may require SIMM modules be installed in a certain order. So, if your new computer memory installation does not work, consider switching the location of the memory.

Set memory in BIOS

Once the memory appears to have been successfully installed into the computer, place the case back onto the computer and connect the keyboard, monitor, and power to the computer (we recommend that you do not connect all the cables yet, if problems are experienced you may have to disconnect all the cables again).

As the computer is booting, enter the BIOS and either set the memory to its proper settings or verify that the computer's memory is being properly detected. Once changed or verified, save the settings, exit BIOS and reboot the computer.

Additional help and information about the BIOS can be found on our BIOS page.

TroubleshootingComputer memory help and support.


Additional information

 How do I remove computer memory in my computer?
How to install computer hardware.
See our memory definition for further information and related links.
Computer memory help and support.

Computer powers on and then immediately turns off

Computer powers on and then immediately turns off


If your computer turns off immediately or even within a few seconds after it is turned on, there could be several possible issues. To proceed, we suggest going through each of the following sections in order as they're meant as a step-by-step guide to help find a solution to your problem.

Note: See our no power or computer does not turn on document if the computer is not coming on at all. If the computer has been on for several minutes before it turns off, see our computer turns off without warning document.

Caution: Some of the steps below require you open your computer. While working within your machine, always be aware of the dangers of ESD.

Loose cable
If the problem persists, make sure all cables inside the computer case are firmly attached to the motherboard and each component. You'll want to check the IDE cables and SATA cables, which are typically connected to the hard drive, CD or DVD drive, and floppy drive (if present). Check both ends of each cable and make sure they are firmly attached to the component and the motherboard. Turn on the computer and test to see if this resolves the issue.

Tip: Sometimes the best way to verify a cable is not loose is to disconnect and then reconnect the cable on both ends.

Electrical short
An electrical short in a computer, which may cause power issues, happens when pieces of metal cause a path for electricity to flow through that shouldn't exist. Computers are full of screws, as they hold nearly ever internal component in place, and from time to time they can come loose. Lift up your computer and gently rotate it while softly shaking it from side to side. If you here what sounds like small rocks banging around, it's likely that you have loose screws inside the case. Open the computer up and remove them.

Memory issue
Verify the memory modules are properly seated in the memory slots on the motherboard. To do this, open the computer, remove the memory modules from their slots, and gently reseat them. It also is important to note that memory modules should be installed in pairs and in matching slots, which are designated by matching colors. Make sure the chips are firmly seated and the clamps on both sides of each chip snap into place. Plug in the power cord and turn the computer on to see if the issue is resolved.

How to install computer memory (RAM).


Power supply issues


Power supply voltage switch

In some cases, a power supply voltage switch, which is the small red switch located the back near the one for power, can be on the wrong setting. If this switch's setting is not correct for your country, your computer may not stay on. The first thing to do is consult the Voltage Valet website to discern your country's correct settings. After you know them, make sure your power supply voltage switch is set accordingly.

Possibly defective power supply

The next thing to check is whether or not the power supply is functional. A faulty power supply can result in not enough, if any, power getting to the motherboard, which would cause the computer to shut off immediately or not turn on at all. Many online computer retailers sell power supply testing units that may be purchased for under $20. In the event of a bad power supply, the only remedy is to replace it with a new one. Fixing a power supply is not an economical solution, if it's even possible at all.

Overheating
If this is a new computer or the motherboard has been recently replaced, make sure that the thermal compound is properly applied to the processor. If the heat is not being properly transferred from the CPU to the heat sink, it can overheat almost immediately.

Motherboard issue
The last thing to check would be the motherboard; however, this can be rather difficult since the issue could be just about anywhere in the circuitry. A faulty circuit or malfunctioning component (e.g., capacitor) can cause the computer to shut off immediately or not turn on at all. If none of the above recommendations help resolve the issue, we suggest sending the computer to a repair shop or replacing the motherboard.

Additional information
POST troubleshooting steps.
No power or computer does not turn on
See our power supply definition for further information and related links.
Computer power supply help and support.

Is it better to leave the computer on or turn it off?

Is it better to leave the computer on or turn it off?


Even though sessions vary with usage, all of us need to step away from our computers at some point. Many of our users wonder if it's a good idea to leave their computers on, or turn them off. The answer to this question depends on a number of factors ranging from electricity bills to concerns about wear and tear. The following sections address the "on or off" debate from many viewpoints, allowing the viewer to make a decision for him or herself.


  • Power concerns
  • Leaving your computer on over night
  • Will turning off a computer wear down moving parts (e.g., fans)?
  • Does turning off a computer wear down the power button?
  • Does turning off a computer cause soldering cracks?
  • Will turning my computer off help prevent a power surge?
  • Computer power misconceptions

Power concerns

One of the biggest contributing factors when deciding whether or not you turn off your machine is the cost of leaving it on. A bill for electricity can be expensive and a computer—like many household electronic devices—is a contributing factor. Unless you'll be away for a very long time from a computer that is on, the difference in price isn't a large concern. However, if you're looking to save a few dollars a month, shut it down.

Note: If you decide to leave your computer on all day, we recommend turning off the monitor if you're leaving for more than half of an hour.

Time to resume


In our opinion, the time for your computer to resume working is a bigger factor the cost of electricity. For instance, if you open and close your laptop frequently, you don't want to have to reboot it completely each time. Knowing a bit about the different power states of a computer should help you in your decision.

Sleep - All of the open applications and files are stored in RAM, and the rest of the computer components are put into a low-power state. This option is best when you're only going to be stepping away from your computer for a short time because it boots back to the desktop the fastest.
Hibernate - With hibernate mode, all of the open applications and files are copied onto your computer's boot drive, and the rest of the computer is essentially shut down. This option is good if you'll be away from your computer for a medium period of time.


Shut down -
When you shut a computer down, all files and applications are closed, and power to the computer's internal components is cut off. Shutting down is a good option if you'll be away from you computer for an extended period of time (e.g., more than eight hours).


Note: The time to resume from different power states is much more significant on hard disk drives than it is on solid-state drives. Since boot times on modern SSDs are so fast, shutting down your computer is not nearly as much of a factor.

Leaving your computer on over night

Our recommendation for most users is turn off your computer when you go to bed as it will save you a bit of money on your electricity bill. However, if you want tasks to run during the night such as a backup, ScanDisk, Defrag, or a virus scan, you'll need to leave your computer on while you sleep.

Will turning off a computer wear down moving parts (e.g., fans)?

No. The only moving parts that caused an issue internally were within a component, not the computer itself. In older hard drives, the head would come into contact with the disk platter upon shutdown, which caused it to wear. However, any hard drive manufactured today doesn't have this issue.

Does turning off a computer wear down the power button?

Before 1994, it may have been beneficial to leave the computer on due to potential power switch related issues associated with certain manufacturers that caused the power buttons to break prematurely. However, this issue was only applicable to a very small portion of old OEM computers, and today, is no longer a problem. Power buttons can still wear out, but they have a life cycle that will far outlast the other components of your computer.

Does turning off a computer cause soldering cracks?

No. Solder is meant to withstand changes in temperature; turning a computer off frequently will not harm it. For example, many individuals turn their TV on and off each day, sometimes several times. Much like a computer, components within the TV get hot and cool down, and these devices have no issues.

Will turning my computer off help prevent a power surge?


Power surgeNo. A power surge destroys electrical devices regardless of whether they are on or off. Having the power cord connected to a surge protector can safeguard a computer from an electrical surge.

Note: If a storm causes a blackout or brownout, it can cause problems with a desktop computer. To prevent these power-related problems from affecting a computer use a UPS.

Computer power misconceptions

"As the computer boots, it takes more power.
This statement is not true.

"Turing off my computer causes power surges."

This statement is also untrue.

"Leaving a computer on causes it to overheat."

Unless a fan within a computer fails while it is on, the computer will not overheat.

"A laptop is different than a desktop it should be turned off."

Although physically different, a laptop can also remain on 24/7 just like a desktop, and all of the information mentioned above still applies. The exception here, of course, is if you are running a laptop off of the battery (not plugged in). In this case, the laptop is not going to be able to run all day, and you should conserve your battery usage.

Additional information
How to disable power management, standby, and sleep in Windows.
How do I disable the power, sleep, or wake buttons in Windows?
Is it ok for a laptop to go into standby or hibernate instead of turning it off?
How often should I reboot or restart my computer?
How to shut down a computer.
Computer Power Management help and support.
See our power supply definition for further information and related links.
Computer power supply help and support.

Tuesday 27 February 2018

Why does my computer turn off without warning?

Why does my computer turn off without warning?


Tip: This document is for computers that turn off and remain off after an extended period of use. It is not for computers that turn back on (restart), computers that shut off immediately upon powering up, or computers that do not turn on at all.

Caution: Some of the steps below require you to work inside your computer. Before opening your case, be aware of the dangers of ESD.

Heat related issue
Most computers today are designed to turn off automatically if any of its inner components overheat. Often, heat related issues occur when the computer is working hard, e.g., playing a graphically intense computer game.

Start by verifying the fan on the power supply is working by examining the back of the computer. The fan should be moving quickly and smoothly. All other fans in the computer require you to open your case to inspect them. Once you have access to the inside of your machine, examine the processor (heat sink), video card, and case fans. If you have heard any abnormal noises coming from your computer, such as a high squealing sound, it could be an indication of a fan malfunction.

If you find that the fan in the power supply is not working correctly or at all, and the power supply is very hot to the touch, you may need to replace the power supply. An overheating power supply, due to a malfunctioning fan, can cause a computer to shut off unexpectedly. Continuing to use the faulty power supply can result in damage to the computer and should be replaced immediately.

Note: If your issues are on a laptop, we do not suggest opening the computer. Instead, verify the fan on the side of the computer is working and blowing out hot air. Also, with a laptop, you may want to invest in a cooler pad to help lower its running temperature.

Tip:
Working on the interior of your machine provides an opportune time to clean the inside. Dust, dirt, hair, and other trapped debris can prevent proper air flow, which may lead to overheating.

Tip: If your BIOS monitors the RPM of the fans, enter the BIOS and make sure the BIOS does not report any errors. Software utilities such as SpeedFan can also be used to help monitor fans in your computer.

Tip: Check the processor heat sink to make sure it is properly seated and has the correct amount of thermal compound.

Caution: If you do remove the processor heat sink, thermal compound should be cleaned off and new thermal compound should be applied.

Is there a way to tell how hot my CPU is running?
What should be the temperature of my processor?


Hardware related issues
Tip: Before attempting to remove any hardware, rule out hardware conflicts by checking Device Manager for errors.

Any failing hardware component in your computer could cause your computer to unexpectedly turn off without warning. If you have recently added any new hardware, remove it from the computer to make sure it is not the cause of the problem.

If you have not recently installed any new hardware into the computer, the next best solution is to systematically remove non-essential hardware. For example, remove your modem, network card, sound card, and any other expansion cards that are not needed for your computer to operate. Running the computer without these cards may help diagnose your issue.

Problem with UPS or surge protector
Make sure any surge protector or Uninterruptible Power Supply (UPS) is not the cause of your problem by connecting the computer directly to the power outlet on the wall. Also, if you have a UPS that connects a USB cable to the computer to manage power saving features, make sure it is also disconnected.

If this resolves your problem, you may have a defective surge protector or UPS. In the case of the UPS, there may be other issues, such as a UPS overload or UPS drivers, reporting bad power situations that cause your computer to shutdown. Make sure there are not too many devices connected to your UPS and that it has the latest software updates.

Computer virus
Your computer may be infected with a virus or other malware that is designed to shut down your computer upon certain conditions. If your computer seems to be turning off when executing a certain program at specific times of the day, it could be infected.

If you believe your computer may be infected with a virus, download a free scanner. If you already have one installed, make sure your virus scanner definitions are up-to-date, then run a full scan.

Issue with operating system
If after following each of the above recommendations your computer still continues to shut off, it is possible you are experiencing a problem at the operating system level. To see if this is the case, try the steps below.

Reboot the computer and enter CMOS setup as the computer is booting.

After you have loaded the computer in CMOS setup, let the computer sit.
If the computer does not turn off after staying idle in CMOS, your operating system installation may be corrupt. We recommended that you erase everything and reinstall Microsoft Windows.

Other failing hardware
If your computer turns off abnormally during (or just after) installation of your operating system, it is likely that other hardware is failing in the computer. Often, the hardware causing the issue will be either the RAM, CPU, motherboard, power supply, or video card, in that order.

Steps on how to test your computer memory for errors.
If you have extra parts or know someone who has a similar configuration that allow you to try their hardware in your computer, you can swap each part to determine if it is at fault. Otherwise, you need to have your computer serviced.

Additional information
My computer monitor randomly shuts off.
Computer does not turn on.
See our power down definition for further information and related links.
Computer power supply help and support.

How to turn off, restart, and shut down Linux

How to turn off, restart, and shut down Linux


Below are the ways to shut down, turn off, reboot, etc. a Linux computer from the GUI or the command line.

Shutting down or rebooting the computer from a GUI interface
Shutting down or rebooting the computer from a GUI interface depends on which GUI you are using. Often the shutdown, log out, and reboot options are available through the GUI's main menu or bar located on one of the sides of the window.

If you are unable to find a method of shutting down or rebooting the computer through the GUI, remember you can shut down or reboot the computer using the commands referenced below. You could also create scripts that would run these commands from the GUI.

Command line commands
Commands at the command line interface can be used for halting, turning off (power off), rebooting, or shutting down Linux. Click on the links below to view more details about each command.

halt
poweroff
reboot
shutdown


Additional information
How to shut down a computer.
See our reboot and shutdown definition for further information and related links.
Linux help and support.

Computer does not turn off

Computer does not turn off

To help protect a computer from being improperly turned off when it's running, the power button will not turn off a computer. If your computer is frozen or encountering other problems and needs to be turned off, press and hold down the power button without letting go for 5 to 10 seconds. Holding down the power button allows you to turn off the computer.

If the computer is working fine and you want to power down the computer, see our how to shut down a computer steps for instructions on how to shut down all types of computers.

Tip: While a computer is running, pressing the power button may put the computer into sleep mode. When a computer is in sleep mode, the power indicator usually flashes and pressing a button on the mouse or keyboard wakes up the computer.

Finally, if you have a laptop computer and following the above steps does not turn off the computer, unplug the computer and remove the battery.

Additional information
What should I do when a computer freezes or locks up?
No power or computer does not turn on.
See our power supply definition for further information and related links.
Computer power supply help and support.

Keyboard

Keyboard

A computer keyboard is one of the primary input devices used with a computer that looks similar to those found on electric typewriters, but with some additional keys. Keyboards allow you to input letters, numbers, and other symbols into a computer that can serve as commands or be used to type text.


  • Keyboard overview
  • QWERTY keyboard layout
  • Keyboard ports and interfaces
  • Types of keyboards
  • Laptop keyboards
  • Smartphone and tablet keyboards
  • Why is the keyboard an input device
  • How to use a keyboard
  • How can I improve my typing?
  • When was the first keyboard invented?
  • Keyboard shortcut keys
  • Related keyboard pages
  • Computer keyboard help and support

Keyboard overview
The following image shows a 104-key Saitek keyboard with indicators pointing to each of the major key sections of a keyboard including the control keys, function keys, LED indicators, wrist pad, arrow keys, and keypad.


 QWERTY keyboard layout

 
Below is a closer up image of a QWERTY computer keyboard with each of the keys selectable. Hover over any of the keys below to see a description of the key and click any of the keys to open a new page with full details about the key.


Keyboard ports and interfaces


Today, most desktop computer keyboards connect to the computer using either USB or Bluetooth for wireless communication. Before USB, a computer may have used PS/2, Serial, or AT (Din5) as a keyboard interface.

How to connect and install a keyboard.

Types of keyboards
Today, most keyboards are similar to each other, but may be missing one or more of the sections mentioned earlier (e.g., the keypad). Where keyboards begin to differ the most is with the keyboard layout. While most keyboards use the QWERTY layout, there are still people who use the DVORAK layout.

How many keys are on a computer keyboard?
Laptop keyboards

A laptop keyboard is different from a desktop keyboard to help reduce the size and the overall weight of the laptop. Most laptop keyboards are made smaller by placing the keys closer to each other and not always including control keys or a keypad. For a laptop to have all the same functions of a desktop keyboard, laptop keyboards use a Fn key that is used in conjunction with other keys to perform special functions. For example, pressing the Fn key and the up or down arrow on the keyboard shown below, increases and decreases the brightness of the screen.

Another difference with a laptop keyboard is the type of switch beneath each key or how the keys feel when pressed down. Some users may even experience more typing errors when typing on a laptop because of how easy it can be to press another key next to the key you intended to press.


Smartphone and tablet keyboards


Today's smartphones and tablets do not come with a physical keyboard, although it may be purchased as an optional peripheral add-on. These devices utilize a thumb keyboard or on-screen keyboard to type messages and enter text into various fields. The image to the right shows an example of the Apple iPhone on-screen keyboard, used on all of apples touch-based devise.

Why is the keyboard an input device
?
A computer keyboard is considered an input device because it only sends data to a computer and does not receive any information back.

Related keyboard pages
How to use a keyboard.
How can I improve my typing?
Not all of the keys on my keyboard are functional.
When was the first keyboard invented?
Keyboard shortcut keys.
Computer keyboard manufacturers.
Computer keyboard help and support.
AFK, Alt, Ctrl, Delete, Enter, Hardware terms, Home row keys, Keyboard terms, Natural keyboard, Numeric keypad, OSK, Shift, Spacebar, Tab, Typewriter, Windows key

Power down

Power down


Power down, shut off, switch off, or turn off are all terms used to describe the act of closing all of the applications that are currently being used, and then properly cutting power to a computer along with all other devices connected to it.


With most computers, when you quickly press the power button once, the computer will power off automatically. If you need to turn off a computer because of a problem, you can press and hold the power button. To learn alternative ways to turn off your machine, check out our page on how to shut down a Windows computer.

Related pages
How to turn off, restart, and shut down Linux.
Computer does not turn off.
Computer turns off without warning.
Is it better to leave the computer on or turn it off?
Computer powers on and then immediately turns off.
Turn your monitor off using your keyboard.
Computer power supply help and support.
Freeze, Off, Power button, Power terms, Power up, Shut down


Monitor - Monitoring network upload and download data transferred,

Monitor


A monitor may refer to any of the following:

1.Alternatively referred to as a video display terminal (VDT) and video display unit (VDU), a monitor is an output device that displays video images and text. A monitor is made up of circuitry, a screen, a power supply, buttons to adjust screen settings, and casing that holds all of these components.

Like most early TVs, the first computer monitors were comprised of a CRT (Cathode Ray Tube) and a fluorescent screen. Today, all monitors are created using flat panel display technology, usually backlit with LEDs. The image to the right shows an ASUS LCD monitor.

When was the first computer monitor invented?
The first computer monitor was part of the Xerox Alto computer system, which was released on March 1, 1973.

Why is a monitor an output device?
A monitor is only used to display (output) information from a computer and provides no source of input. For this reason, a computer monitor is considered an output device.

Note: Newer PCs, smartphones, and tablets have touchscreens, which allow the user to interact with their computer by touching what is shown on the screen with their finger. If the monitor has touchscreen capabilities, it is considered an Input/Output devices. However, if it has no source of input it is only considered an output device.

Types of monitor connections
Computer monitors have at least one of the following types of monitor connectors to connect to a computer.

DVI
HDMI
VGA
Video adapters are available to convert from one type of connector to another, such as DVI to VGA or HDMI to VGA, and vice versa.

Related pages
No display on the monitor.
Distorted or skewed image on the monitor.
Computer monitor manufacturers.
Computer monitor help and support.


2.Monitor is a term used to describe the act of watching over someone or something.

Related pages


Monitoring network upload and download data transferred,
Protecting children from harmful material and people on the Internet.
How can I monitor my website's status?
Computer security questions and answers.


3.A resident monitor was system software used with machines utilizing punch card input. Resident monitors came before, but was very similar to, an operating system.

Display, Hardware terms, Output device, RGB monitor, Security terms, Video terms, CRT

Why are there bumps on the F and J keyboard keys?

Why are there bumps on the F and J keyboard keys?


The small bumps or ridges found on the F and J keys on a computer keyboard are to help users correctly position their left and right hands without having to look at the keyboard. For example, without looking at your hands, you can feel the correct position of your left index finger on the F and the right index finger on the J by feeling the small bumps on the keys. Once you're hands are on the home row key position, you should be able to locate the remainder of the keys on the keyboard.


Tip: The number 5 on keyboards with a numeric keypad also has a bump to help position your hand on the key pad.

Additional information
Where should my fingers be positioned on the keyboard?
See the keyboard definition for further information and related links.
Keyboard help and support.

Turn your monitor off using your keyboard

Turn your monitor off using your keyboard

Using the Monitor Off Utility is a quick and easy way to turn off your monitor when you step away from your computer. As can be seen in the below screenshot, this utility allows the user to setup any HotKey to turn off their monitor from anywhere in Windows. This utility also can have a shortcut key start a screen saver and lock the workstation as an extra form of security.


Not only does this program help protect your computer it is the best way to save money on your power bill if your computer is on all day.


Download the MOnitor Off Utility
 
Tip: Although this utility is claiming to turn off the monitor, it is actually putting the monitor into Standby. Although Standby mode is similar to turning off your monitor, we'd still recommend that you turn off the monitor if you're going to be away from the computer for an extended period of time.


Additional information
See our keyboard, monitor, and turn off definitions for further information and related links on these terms.


Sunday 25 February 2018

How to prepare Charts in MS-Excel

Network terms

Database terms - Internet terms - Network protocols - Network ports - Security terms
 

Top 10 Network Terms
 

Class A
Internet
Network
Bus topology
Hub
Network protocols
TCP/IP
Network server
Ring topology
Network adapter

Number
10 Gigabit Ethernet
1000BASE-CX
1000BASE-LX
1000BASE-SX
1000BASE-T
100BASE-T
100BASE-T4
100BASE-TX
100BASE-FX
100BASE-X
100VG-AnyLAN
10BASE-2
10BASE-5
10BASE-T
1U
2U
3GPP
3U
4U
586A
586B
5U
6to4
6U
7U
802 standards
802.3
802.3ab
802.3ae
802.3u
802.3z
802.11
802.11a
802.11b
802.11c
802.11d
802.11e
802.11f
802.11g
802.11i
802.11j
802.11n
802.12
802.16


A

A record
Access log
Access point
Access rights
Access server
Account
Ack
ACL
ACR
Active directory
Active topology
Ad
Ad hoc
Address resolution protocol
ADSI
ADSL
Agent
APIPA
Aloha
Anonymous
Antenna
Anycast
Apache server
Apple Airport
AppleTalk
Application layer
Application server
ARCnet
ARP
ARPA
ARPANET
AS
ASN.1
ASP
Asynchronous Transfer Mode
ATM
Attachment Unit Interface
AUI
Autonomous system
AWS

B
Backbone
Bandwidth
Base station
Baseband
BDC
Beowulf
BER
BERT
BGMP
BGP
Bind
Bisync
Bit stuffing
Bitnet
Bittorrent
BlackBerry Enterprise Server
BlackBerry Messenger
Blade
Blade server
BNC
BNC Connector
BOOTP
Bootstrap protocol
Border Gateway Protocol
Bottleneck
BPDU
BPL
BPSK
BranchCache
Bridge
Broadband
Broadcast
Broadcast address
Broadcast domain
BSDI
BSS
BSSID
Brouter
Burst
Bus topology


C

Cable
Cable tester
CAP
Cascading hubs
CAT1
CAT3
CAT4
CAT5
CAT5e
CAT6
CAT7
CCIE
CCNA
CCNP
CCS
CDDI
CDN
CHAP
Chernobyl packet
CIDR
CIFS
CIM
CIR
Citrix
Class A
Class B
Class C
Class D
Class E
Clear text
CLI
Client
Cloud computing
Clustering
CNAME
CNE
CNST
CO
Coaxial cable
Co-location
Coaxial cable
Collision
Colo
Colocation
Command Line Interface
Communication device
Communications
Communications protocol
Communications controller
Computer name
Connectionless
Contention
Convergence
Core router
CREN
Crimp
Crimping tool
Crossover cable
Cross-platform network
Crosstalk
CSMA/CD
CSNET
CSU/DSU
CTCP
cURL

D

Data center
Data line
Data link layer
Data transfer
Data transfer rate
Datagram Delivery Protocol
DB-9
DB-15
DCOM
DDP
DDR
Dedicated server
Decentralized process
Deep Space Network
Default user
Denial Of Service
DHCP
Dial-on-Demand Routing
Digital data transmission
Directory harvest attack
Disk quota management
Disk server
Diskless workstation
Distributed systems
DIX
DNS
DNS hijacking
DNS record
DoCoMo
Domain
Domain controller
Domain forwarding
Domain join
Domain local group
Domain name
Domain name registrar
Domain namespace
Domain Name System
Domain tree
DOS
Down
Download
Downtime
DS3
DSAP
DSL
DSR
DTX
Dumb terminal
Dynamic allocation
Dynamic Host Configuration Protocol


E
E-mail
E-1
Echo
Edge device
Edge router
EDIINT
Egress filtering
EIGRP
Encapsulation
Enterprise-Wide Network
Entry
Error rate
Ethereal
Ethernet
Ethernet adapter
Ethernet controller
Ethernet frame
Ethernet SNAP
EtherPEG
Ethertalk
Evil twin
Exchange
Expect
External IP address
External LAN adapter
Extrenet port
Extranet

F
F connector
Fast Ethernet
Fault tolerance
FCIP
FDDI
FDDI-2
FEC
FEP
FFDT
Fiber-optic
FidoNet
File server
File sharing
File transfer
File Transfer Protocol
FiOS
Firewall
Flood
FOIRL
Forests and trees
Forward error correction
FQDN
FR
Frame
Frame relay
Free Space Optics
Freenet
Front End Processor
FSO
FSP
FTAM
FTP

G
G.SHDSL
Gateway
GBIC
Geocast
Glass house
Ground loops
Group policy
GroupWare
Guest

H

H.323
Handshake
HDLC
HDSL
HELO
Heterogeneous network
Hidden share
Home network
HomeGroup
Homogeneous Network
Hop
Hops
Host
Host computer
Host priority
Hosts file
Hostid
Hostname
HSS
HTTP server
Httperf
Hub
Hubbed mode
Hybrid cloud
Hybrid topology
Hyper-V

I

IANA
ICA
Icacl
ICANN
ICMP
ICT
IDSL
IEEE 802 standards
IEN
IGES
IGMP
IGRP
IIS
IMAP
Infrared broadband
Internal IP address
Internet
Internet Information Server
Internet node
Internet Packet eXchange \ Sequential Packet eXchange
Internet Protocol
Internet Protocol Television
Intranet
InterNIC
Interoperability
IP
IP cloaking
IP spoofing
IPP
IPsec
Iptables
IPTV
IPX/SPX
IPv4
IPv6
IS
ISATAP
ISDN
ISIS
ISP

J
Jabber

K
Kerberos

L

L2TP
LAN
LAN segment
Latency
LAWN
Layer 1
Layer 2
Layer 3
Layer 4
Layer 5
Layer 6
Layer 7
Layer 8
Leased line
Leech
LFAP
Line-side T1
Link aggregation
Link state packet
LLC
Lmhost
Load balancing
Local
Local Area Network
Local IP address
Localhost
Locking
Lockout
Log on
Log off
Logical unit
LOF
Loopback
LOS
LSP
LU

M

MAC
Mail server
Mainframe
MAN
Map
MAPI
MAU
MCSA
MCSE
MDaemon
Mesh topology
Metcalfe's Law
MIB
Miroring
MMS
Modbus
MPLS
MPP
MRU
MSAU
MSCS
MTU
Multi-mode fiber
Multi-user system
Multicast
Multiplex
MX record
My Network Places

N


N+
NAK
Nameserver
Name server protocol
NAP
NAPT
Narrowband transmission
NAS
NAT
NBT
NCP
NDIS
NDR
NDRO
Negate
'Net
Net architect
Net neutrality
NetBEUI
NetBIOS
NetBIOS over TCP/IP
Netio
Netmask
Netstat
Netting
NetWare
Network
Network+
Network Access Protection
Network adapter
Network address
Network administrator
Network architecture
Network Control Panel
Network database
Network directory
Network drive
Network engineer
Network layer
Network media
Network Management System
Network Neighborhood
Network operating system
Network printer
Network segment
Network server
Network socket
Network structure
Network terminal number
NFS
NIC
NIT
NMS
NNTP
Node
Node address
NOS
Notwork
NSAP
NSFNET
Nslookup
NSP
NSPA
NTN
NTP

O
Octet
ODI
OID
Open
OpenSSL
OpenStack
Optical fiber
Optical wireless
Oracle public cloud
OSPF
Overlay network


P

PaaS
Packet
Packet aggregation
Packet switching
PAD
PAN
PAT
Patch cable
Patch panel
Payload
PDC
PDU
Peer
Peer-to-peer communications
Peer-to-peer network
Permission
Physical layer
Physical unit
Piggyback
PIM
Ping
Ping of death
Ping pong
POP
POP3
Port
Port forwarding
Port scanner
Port triggering
Power user
PPP
PPPoE
PPTP
Presentation layer
Print server
Promiscuous mode
Protocol
Proxy
Proxy server
Pseudo terminal
Ptm
Pts
Pty
Push e-mail
Putty
PXE

Q
QMAC
QoS
QPSK

R

Rackmount
RADIUS
RADSL
RAP
RAS
rDNS
RDP
Remote access
Remote Access Server
Remote Desktop
Remote Media Streaming
Remote user
Repeater
RequestTTY
Reserved address space
Resource record
REST
Reverse DNS lookup
Reverse resolving
RF
Ring sequence
Ring status
Ring topology
RJ-45
RLP
Roam
Rollover cable
Round robin
Route
Route aggregation
Router
Routing
Routing algorithm
Routing table
RPC
RRAS
RTCP
RTP
RTSP
RTTP


S

S band
SaaS
Samba
SAN
SAP
SATAN
Satellite
S-band Multiple Access
SDLC
SDSL
SDU
Sequenced Packet eXchange
Serial
Server
Server Farm
Service Advertising Protocol
Session layer
SFTP
Shared directory
Share
Shared folder
Shielded Twisted-Pair cable
Short-haul
Sign off
Sign on
Single-mode fiber
Sitename
SLA
SLIP
SMA
Smart terminal
SMS
SMTP
SNA
Sneakernet
Sniffing
SNMP
SOA
Socks
SONET
Spanning tree
Spanning tree protocol
SPI
Spoof
Spoofing
SPX
SSAP
SSH
SSHD
SSID
SSL
SSTP
Stack
Star topology
Stateful firewall
Stateless
Static
Static allocation
STM
STM-1
STM-4
STM-8
STM-16
STM-64
Store-and-forward
STP
STP Cable
Straight through
Streaming content
STS
STS-1
STS-3
STS-12
STS-24
STS-48
STS-192
Subdomain
Subnet
Subnet mask
Subnetwork
Supercomputer
Switch
SYN
SYN attack
Syslog
SYSOP
System administrator
System operator

T

T1
T2
T3
TA
TACACS
TCP
TCP fingerprinting
TCP/IP
TeamViewer
Telecommunications
Telepresence
Teleprocessing
Telnet
Teredo
Terminal
Terminal emulation
TFTP
Thick client
Thick Ethernet
Thin client
Thin Ethernet
Throttle
Throughput
Time server
Time-out
TLD
Token
Top-level domain
Topology
TOPS
TOS
TP-PMD
Trace
Tracepath
Traceroute
Traffic
Traffic shaping
Transfer rate
Transit network
Transmit
Transport layer
Trunk
TTL
Tunnel
Turnpike effect
Twisted-pair cable


U

UDSL
Unethical hack
Unicast
Uniformity
UNC
Unshielded Twisted Pair cable
Uplink
Upload
UPnP
Upstream
User
User account
User group
User profile
Username
uTorrent

V

VAN
VADSL
VBR
VC
VCI
VDD
VDSL
Vhost
Virtual computing
Virtual host
Virtual router
Virtualization
VLAN
VMware vSphere
VNC
VOIP
VPN
VPS
VRRP
VSAT

W


Wake On LAN
Walled garden
WAN
WAP
WBEM
Web farm
Web forwarding
Web host
Web server
Webcast
WEP
WFW
WHOIS
Wide Area Network
Wideband transmission
Wi-Fi
WiMAX
Winpopup
WINS
Winsock
Wire stripper
Wireless
Wireless adapter
Wirelessly
WireShark
WISP
WLAN
WOL
Workgroup
Workstation
WPAN
WPS

X
X.25
X.400
Xerox network services
XMT

Y
Currently no listings

Z
ZAK
Zarafa
Zero configuration network
Zeroconf
ZIP
Zombie
Zone

SMTP

SMTP


Short for Simple Mail Transfer Protocol, SMTP is an Internet standard for the sending of e-mail messages over port 25. While it is mostly used for transfer from one mail server to another, some client mail applications use SMTP for relaying messages; whereas receiving happens via POP or IMAP.

Tip: If you are looking for your SMTP address or SMTP server, this information is only obtainable from your ISP or e-mail provider.

Related pages

Unable to receive or send e-mail.
Computer network and network card help and support.
E-mail, E-mail terms, Network terms, Protocol, X.400

E-mail

E-mail

Short for electronic mail, e-mail or email is information stored on a computer that is exchanged between two users over telecommunications. More plainly, e-mail is a message that may contain text, files, images, or other attachments sent through a network to a specified individual or group of individuals. The first e-mail was sent by Ray Tomlinson in 1971. By 1996, more electronic mail was being sent than postal mail.

E-mail address breakdown
How to send and receive e-mail
Writing an e-mail
What makes a valid e-mail address?
Advantages of e-mail
Related e-mail pages.
E-mail help and support.


E-mail address breakdown

The first portion all e-mail addresses, the part before the @ symbol, contains the alias, user, group, or department of a company.


Next, the @ (at sign) is used as a divider in the e-mail address; it is required for all SMTP e-mail addresses since the first message was sent by Ray Tomlinson.

How to send and receive e-mail
E-mail Program


To send and receive e-mail messages, you can use an e-mail program, also known as an e-mail client, such as Microsoft Outlook or Mozilla Thunderbird. When using an e-mail client, you must have a server that stores and delivers your messages, which is provided by your ISP or in some cases, another company. 


An e-mail client needs to connect to a server to download new e-mail, whereas email stored online (see next section) updates automatically when you visit the site.

E-mail Online

An alternative way of sending and receiving e-mail (and the more popular solution for most people) is an online e-mail service or webmail. Examples include Hotmail (now Outlook.com), Gmail, and Yahoo Mail. Many of the online e-mail services, including the ones we just mentioned, are free or have a free account option.

Writing an e-mail

When writing an e-mail message, it should look something like the example window below. As you can see, several fields are required when sending an e-mail:

The To field is where you type the e-mail address of the person who is the recipient of your message.


The From field should contain your e-mail address.


If you are replying to a message, the To and From fields are automatically filled out; if it's a new message, you'll need to enter them manually.


The CC or Carbon Copy field allows you to send a copy of the message to another e-mail address, but is not mandatory.


The Subject Line, although not required, should consist of a few words describing the e-mail's contents.


Finally, the Message Body is the location you type your main message. It often contains your signature at the bottom; similar to a hand-written letter.


What makes a valid e-mail address?

There are several rules that an e-mail address must follow to be valid:

As mentioned earlier, an e-mail must have a username followed by an @ (at sign) which is followed by the domain name with a domain suffix.


The username cannot be longer than 64 characters long and the domain name cannot be longer than 254 characters.


There should be only one @ sign in an e-mail address.


The space and special characters: ( ) , : ; < > \ [ ] are allowed. Occasionally, a space, backslash, and quotation mark work but must be preceded with a forward slash. Although valid, some e-mail providers do not allow these characters.


The username and e-mail addresses as a whole cannot begin or end with a period.
The e-mail must not have two or more consecutive periods.


Advantages of e-mail
There are a number of advantages of e-mail and the usage of e-mail versus postal mail. Some of the main advantages are listed below.

Free delivery - Sending an e-mail is virtually free, outside the cost of Internet service. There is no need to buy a postage stamp to send a letter.


Global delivery - E-mail can be sent to nearly anywhere around the world, to any country.


Instant delivery - An e-mail can be instantly sent and received by the recipient over the Internet.


File attachment - An e-mail can include one or more file attachments, allowing a person to send documents, pictures, or other files with an e-mail.


Long-term storage - E-mails are stored electronically, which allows for storage and archival over long periods of time.


Environmentally friendly - Sending an e-mail does not require paper, cardboard, or packing tape, conserving paper resources.

Why am I unable to receive or send an e-mail

Why am I unable to receive or send an e-mail

Internet or Network connection missing

Internet or network connection failures keep your e-mail program from sending and receiving messages. Verify that your computer can connect to the Internet or network.

Issues with Internet or Network e-mail server
Make sure that your Internet e-mail server or your Network e-mail server is not encountering issues by contacting either your Internet Service Provider or your Network administrator. They should be able to tell you if there are any e-mail server issues on their end that are preventing you from receiving or sending an e-mail.

E-mail program incorrectly configured
Many e-mail related problems are because of improperly configured mail settings. Verify that your e-mail program is properly configured to connect to your Internet or Network e-mail server. It is very common for the e-mail program to have either the incorrect POP or SMTP address.

As mentioned on the above links to POP and SMTP, the POP server is used to retrieve mail and the SMTP server is used to send mail. Therefore, if you are having difficulties receiving e-mail, verify that the correct POP server and port is defined. If you are unable to send mail, verify that the correct SMTP server and port is defined.

The default SMTP server is port 25, and the POP3 server is port 110. However, the actual POP3 and SMTP server name varies depending upon your Internet e-mail or Network e-mail provider.

Note: Users may be unable to send an e-mail through an ISP other than their own due to SMTP restrictions that try to reduce spam on the ISP's network.

If you use a different Internet or Network connection while sending e-mail and are unable to send e-mail, verify with the ISP or Network Administrator that an SMTP block is not in place.

When an SMTP block is in place, you will receive one of the below errors.

  • SMTP error
  • SMTP rejected
  • Server response 550
  • SMTP prohibited by administrator
  • Error 0x800ccc79

Security issues

All Internet and Network servers require that users login using their username and password to send and receive e-mail.

Verify that you are entering the correct username and password when attempting to send or receive your e-mail. If you are not being prompted for a username or password, it is likely that the username and password are configured within the e-mail program. Verify that the correct username and password have been entered into the e-mail program's configuration.

Note: Some network administrators or Internet service providers may expire your password after a length of time. If the password is not changed within that time period it is possible that you will no longer be able to receive e-mail until the password is changed.

Spam filter
Spam filters can inappropriately cause you to not receive e-mail. If a spam filter is improperly configured or your ISP believes a message is a spam, it will either placed in the Spam folder or deleted before you can read it. Only your Internet service provider can tell you if this is occurring.

Almost all e-mail programs today have some protection that helps protect users from spam. These programs, scripts, and add-ons can also cause e-mail to be wrongly deleted. If you have problems getting e-mail, make sure all spam filters are disabled on your end as well and no mail is in the junk or spam folder, or in the trash bin.

E-mail program corruption or other issues
If you have checked or verified each of the above recommendations and are still unable to receive or send e-mail, the e-mail program may have issues. Try uninstalling and re-installing your e-mail client. Alternatively you could also try an alternative e-mail client or service.

Microsoft Outlook users may also want to see the Microsoft Outlook help page.

How to unmount a volume in Windows

How to unmount a volume in Windows


If you want to take one of your drives offline, you can unmount it. In Windows, mounting and unmounting a volume is accomplished by changing the volume's drive letter assignment.

  • Drive letters and mounted volumes
  • What happens when a volume is unmounted?
  • Example scenario: secondary volume full
  • Unmount a volume with Disk Management
  • Mount the volume again later

Drive letters and mounted volumes

In Windows, volumes are mounted as drive letters and include drive partitions, removable disks, optical drives, external hard drives, and network drives. For instance, you probably have a partition on your HDD or SSD mounted to the C: drive letter, which contains your Windows operating system. You may have a DVD drive mounted at D: or E:, and perhaps a secondary HDD or SSD mounted at a letter as well.

Anything with a drive letter is "mounted": the operating system has made the volume's filesystem available for reading and writing by user programs, and by the operating system itself. When a volume is not mounted, its data cannot be accessed or altered by conventional means.

The process of changing a drive from mounted to not mounted is called unmounting. Let's look at a scenario where this operation can be useful, and how it can be done.

The following example is performed using Windows 10, but these instructions should also work for Windows 8.1, Windows 7, and Windows XP.

What happens when a volume is unmounted?

When a volume is unmounted, its drive letter is unassigned and may be used by another storage device. While unmounted, the volume's file system is inaccessible by regular reads and writes.

Example scenario: a secondary volume is full

In this scenario, you have a single HDD inside a laptop computer. The drive contains two NTFS partitions, mounted as Windows volumes:

C:, which contains the operating system and all user programs and documents
D:, which contains automatically created backups of critical files in C:
Tip: You can view how much free space you have on your mounted volumes if you open File Explorer (press Win + E), and choose This PC.


The D: drive is 100% full — it has no more free space. That's OK in this case, though, because the backups it contains are complete and up to date. In this scenario, you know you won't need to make another backup for a few weeks, so nothing on the volume needs to change before then.

However, you're experiencing a problem. Because the partition is very full, Windows 10 continuously notifies you that D: is low on disk space:


There's no way to selectively disable this warning for individual partitions. The notifications can be disabled only by modifying the registry — but even then, the notifications cannot be selectively turned off.

If you unmount the volume, these notifications will stop.

Unmount a volume with Disk Management

Disk Management is part of your Windows 10 system software. It allows you to make low-level changes to your storage devices. It can create volumes, resize them, and delete them. Here, you'll use it to unmount a volume.

To unmount a volume:

Open Disk Management. From your Start Menu, choose Windows Administrative Tools, then Computer Management. Then, under Storage, choose Disk Management.
Or, press Win + X (hold down the Windows Key and press X), and choose Disk Management.


In Disk Management, locate the block which represents the volume you want to unmount. The blocks are labeled with volume information, including the drive letter. Right-click the volume, and choose Change Drive Letter and Paths.


 Select the volume's drive letter, and click Remove.


You'll receive a warning, and the prompt "Are you sure you want to remove this drive letter?" Choose Yes.


If any of your programs are currently using the volume, you'll receive an additional warning, "The volume is currently in use… Do you want to continue?" Now's a good time to close any programs that are using the volume. If you choose Yes, Windows will require a restart before the volume is fully unmounted.


You'll be returned to Disk Management, and you can see that the partition no longer has a drive letter.


The partition is now protected from accidental writes, and is effectively frozen. As a benefit, the "Low Disk Space" notifications will no longer pop up (incessantly) for a partition you have intentionally filled with data.

Mount the volume again later

In the scenario above, you would mount the volume again when it was time to move the data to a removable disk, for instance.

You can re-mount an unmounted volume at any time in Disk Manager.

Right-click the unmounted volume and choose Change Drive Letter and Paths.


Click Add. Choose Assign the following drive letter, then pick a letter from the selector on the right. When you're done, click OK.

Good Morning Beautiful

Do you know????

Do you know????
/