 Take a closer look at your disk usage with WinDirStat
If you are running out of disk space on your computer, WinDirStat is a great tool for getting a detailed look at the files and folders taking up the most space.
In this article, we'll walk through how to use this great, free Windows program.
- Why should I use WinDirStat?
- Installing WinDirStat
- Using WinDirStat
- The Treemap
- The Directory List
- The Extension List
- Additional tips
Why should I use WinDirStat?
Windows already allows you to check your free disk space using the File Explorer. In Windows 10, for instance, you can click on This PC in the left pane of any File Explorer window, and see how much space you have available on your disk drives.

If you right-click any disk and select Properties, you will see more detailed information under the General tab.

You can do the same thing with individual directories on your computer. Right-click any folder, select Properties, and Windows will tally up the size of all the files and directories that it contains.
However, these methods don't give you many details. Is there one big file taking up all that space? Is there one particular folder containing lots of big files?
That's where WinDirStat can be used. It can show you a diagram of every file on your computer, and you can see at a glance which files and directories are taking up most of your space.
Let's look at how to install WinDirStat, and how to use it.
Installing WinDirStat
1. In a web browser, go to the WinDirStat download page. It contains links to several places where you can download the WinDirStat installer.

2. Download the installer.
3. Optional step: Verify the checksum of the installer before you run it to verify the software you're running is authentic. For instructions and more information, see our verifying the installer checksum article.
4.Run the installer.
5. The User Access Control prompt will ask for your permission to install WinDirStat. Choose Yes.

6. Review the WinDirStat license agreement. (WinDirStat is published under version 2 of the GPL.) If you accept the agreement, check the box and click Next.
7. Choose which optional components you'd like to install. If you're not sure, you can use the default settings. Click Next to continue.
8. Choose the location on your computer where WinDirStat should be installed. 9. To use the default location, click Next.
10. Click Finish to run WinDirStat.
Using WinDirStat
WinDirStat begins by asking you which drives it should scan. Highlight your choices, or choose All local drives to scan everything. You can also choose to scan only one particular directory on your computer. To begin scanning, click OK.

While WinDirStat performs its scan, it will display Pac-Man animations next to the items being scanned. The scan can take a while, depending on your computer.
You will know that the scan is complete when you see the graph displayed at the bottom of the window in the Treemap.
The Treemap
In the Treemap view, every rectangle represents a single file on your computer. The rectangles are color-coded by file type.

The smallest rectangles (your files) are organized into larger rectangles (your directories). If several rectangles make up a larger rectangle, that means they're all in the same directory.
Click anywhere in the Treemap to highlight a single file. In the image below, we have selected one of the larger files on our computer.

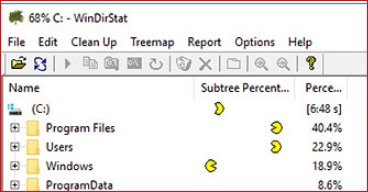
The Directory List
When you highlight a file in the Treemap, it will also be highlighted in the Directory List, which is located in the top-left window pane.

This view is similar to what you might find in the Windows File Explorer. In this view, you can expand and collapse branches of your directory hierarchy.
Details about the highlighted item are provided in columns on the right:
Name — The name of the file or directory.
Size — The size of the file, in bytes. For directories, this number is the total size of all files and subdirectories it contains.
Subtree Percentage — This bar displays what percentage of the parent directory's total is made up by the highlighted item. In other words, if this bar is 1/3 full, the highlighted item makes up 1/3 of the parent item's total disk use.
Percentage — The same as Subtree Percentage, shown as a number.
Files — How many files exist in this subtree.
Subdirs — How many subdirectories are in the subtree.
Items — How many total items in the subtree (Files + Subdirs).
Last Change — Date of the last time anything in the subtree was modified.
Attributes — Attributes of the file or folder. Possible attributes are:
R — Read-only
H — Hidden
S — System file
A — Archive
C — Compressed
E — Encrypted
The Extension List

In the upper-right pane is the Extension List, which shows you what the colors mean in the Treemap. For instance, in our example above, all zip files (files that have the extension .zip) are the same shade of red.
This view provides sortable columns of useful information:
Extension — The file extension.
Color — The color used to display this type of file in the Treemap.
Description — A verbose description of the file type.
Bytes — How many bytes this type of file occupies on your disk.
% Bytes — Same as Bytes, expressed as a numerical percentage.
Files — The number of files on your disk of this type.
Additional tips
Show free space in the Treemap
By default, the Treemap graph does not show the free space on your disk. To show your free disk space as its own rectangle, press F6, or select Show Free Space under the Options menu.
Right-click items for additional options
If you right-click any item in the Directory Tree or Treemap, you are presented with additional options for that item. For instance, you can view Properties here, just as you can do in any File Explorer window. You can also choose to send the item to your Recycle Bin, or delete the item immediately. Deleting a file immediately is equivalent to sending it to the Recycle Bin and then emptying the Recycle Bin. Deleting a file this way will not allow you to undelete the file, so use this option with care.


0 comments:
Post a Comment